
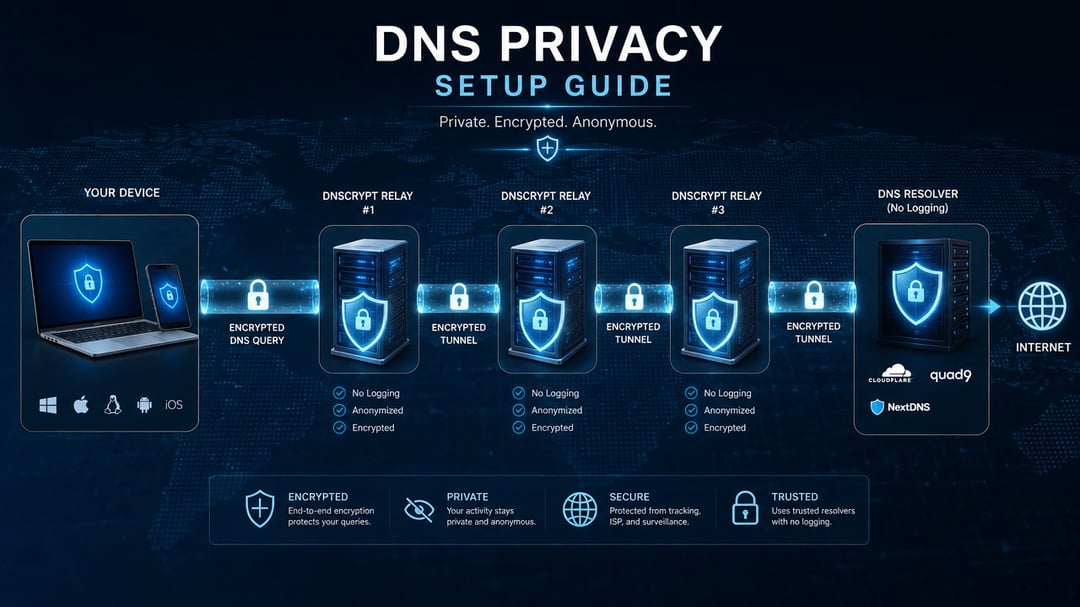
Your ISP can still see every domain you look up, even if you switched to an encrypted DNS provider. Encryption stops the snooping in transit, but the resolver on the other end now has your full browsing history tied to your IP address. Learning how to set up DNSCrypt with anonymized relays solves that second problem by splitting the two pieces of information apart: the relay knows your IP but not your query, and the resolver sees the query but not where it came from.
The setup takes about twenty minutes on Linux, macOS, or Windows, and most of the work happens in a single configuration file. By the end, you will have dnscrypt-proxy running locally, relays chosen and tested, your devices pointed at it, and a way to confirm the whole chain is actually working.
What anonymized DNSCrypt actually does
Standard DNS queries travel in cleartext, so anyone on the path between your machine and the resolver can read them and, in many cases, modify them. DNSCrypt closes that by encrypting and authenticating traffic between your client and the resolver you chose.
That leaves one gap. The resolver still receives your IP address attached to every domain you look up, which is a complete browsing log tied to a single household.
An anonymized relay splits that pairing. Your client encrypts the query so only the resolver can read it, then sends it through the relay. The relay sees your IP but not the domain. The resolver sees the domain but not your IP.
This only works if the relay and resolver are run by different operators. Same operator, no separation.
It also does not hide what happens next: your connection to the site itself still exposes the destination IP address and, on most connections, the TLS SNI field.
Install dnscrypt-proxy on your system
Get the binaries from the official dnscrypt-proxy releases page on GitHub. Avoid third-party mirrors, since a DNS client is exactly the wrong place to trust an unknown build.
Windows
Unpack the archive somewhere permanent, such as C:\dnscrypt-proxy, because the service registers that path. Open an elevated command prompt in that folder and run the included service installation script. If installation fails, something else is already holding port 53, often Internet Connection Sharing or a local DNS tool.
macOS and Linux
Homebrew, apt, dnf and pacman all carry dnscrypt-proxy, though packaged versions lag behind. The manual route is dropping the binary and config into place yourself. On most systemd distributions you must first disable the stub listener in systemd-resolved, which already binds 127.0.0.53:53.
Router and Raspberry Pi setups
OpenWrt and comparable firmware ship dnscrypt-proxy packages. A Pi on the LAN can resolve for every device instead. See our router firmware and home network guides for the groundwork.
Configure relays in dnscrypt-proxy.toml
Copy the file before you touch it. The shipped version is heavily commented, and those comments are the fastest reference you have when something breaks.
Choosing servers and relays
Set dnscrypt_servers = true and doh_servers = false. Relays only work with the DNSCrypt protocol, so any DoH resolver you leave enabled will be queried directly, without anonymization. If you want stricter picks, set require_nolog = true and require_nofilter = true.
In the [sources] section, keep the public resolver list and add the relays list. Server and relay names in your config must match the names in those lists exactly.
Editing the routes block
Each route maps one server name to a list of relay names. A * entry routes every server through the relays you list. Two or three relays per server gives you fallback when one goes offline.
Never pair a server with a relay run by the same operator. Same operator means both hops see your address and your query.
Point your devices at the proxy and restart the service
Set your network adapter's DNS server to 127.0.0.1, the loopback address dnscrypt-proxy listens on. Delete any IPv6 DNS entries at the same time, or replace them with ::1, since a leftover IPv6 resolver will quietly handle queries that never reach the proxy. After editing the configuration file, restart the service: systemctl restart dnscrypt-proxy on Linux, or reinstall the Windows service with dnscrypt-proxy -service install followed by -service start if it refuses to load the new settings.
For whole-network coverage, point your router's DHCP DNS option at the machine running the proxy rather than touching every device. Watch for three things that silently bypass it: secure DNS in Chrome, Edge and Firefox, which resolves over the browser's own provider; VPN clients that push their resolvers on connect; and ISP-supplied routers that override the DNS field you set. Our guides to browser privacy settings and VPN configuration cover disabling both.
Verify the setup and troubleshoot common failures
Start with the proxy's own log. On startup it prints the resolver it settled on and, when relaying is active, the relay carrying your queries. If the relay line is missing, the anonymized routing block never applied. Then run a DNS leak test in a browser. A correct result shows the resolver you picked, or its hosting provider, and no sign of your ISP's nameservers.
Four failures account for most trouble. Port 53 already in use means another resolver stub is bound to it; stop that service first. "No usable relay" means the server you chose does not support the relay you paired it with. Total unreachability usually points to a restrictive network blocking outbound DNS ports. Sluggish first queries are normal while the proxy benchmarks resolvers.
Relaying adds a hop, so latency rises. Choosing relays near you or near the resolver helps. To roll back, restore your backup config, restart the service, and set DNS back to automatic.