
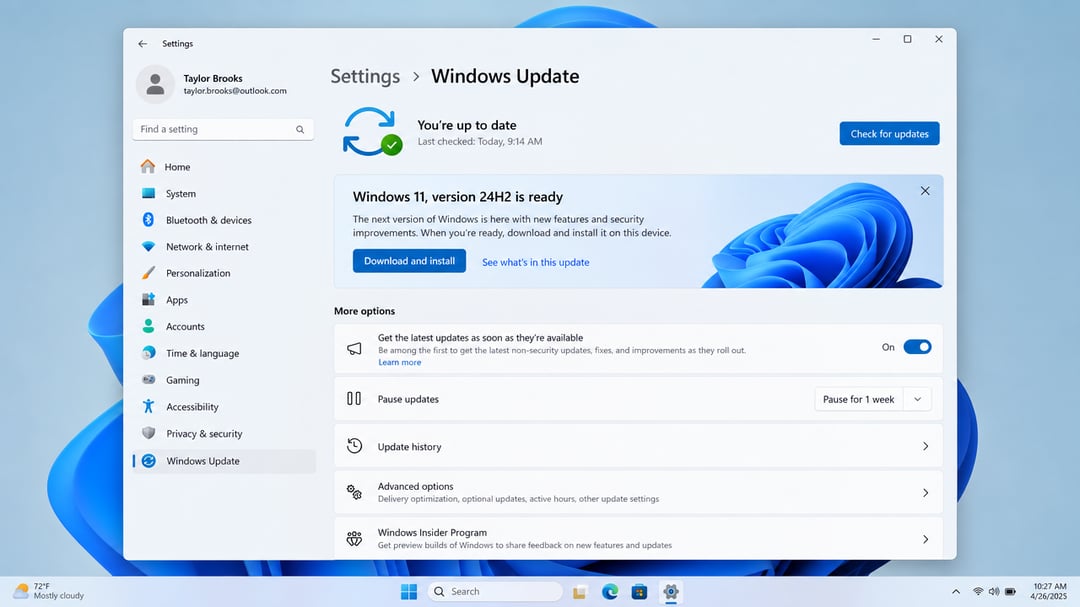
Microsoft still offers Windows 11 as a free upgrade for eligible Windows 10 devices, but the process isn't always as simple as clicking a button. If your hardware meets the requirements, you have three ways to upgrade: through Windows Update, the Installation Assistant, or a clean install using bootable media. Each method has tradeoffs in convenience, control, and how much of your current setup it preserves.
This guide walks through all three upgrade paths, starting with the pre-flight checks that prevent failed installations. You'll learn how to back up your system, verify compatibility, and handle the most common blockers like TPM settings and Secure Boot. By the end, you'll know which method fits your situation and how to execute it without losing data or spending hours troubleshooting.
Pre-upgrade checklist: Back up your data and check compatibility
Back up your files before upgrading. OS migrations can fail or corrupt data, and a backup lets you roll back without losing work. Use Windows Backup (Settings > Update & Security > Backup) to copy files to an external drive, enable File History for automatic versioning, or use third-party tools like Macrium Reflect for a full system image.
Next, run Microsoft's PC Health Check tool to verify your hardware meets Windows 11's requirements. The tool flags missing components like TPM 2.0 or incompatible processors. If TPM or Secure Boot are disabled, you'll need to enable them in your BIOS before the upgrade proceeds. For a detailed breakdown of what your system needs, see our companion article on Windows 11 system requirements.
Method 1: Upgrade using Windows Update
If your PC meets the system requirements, Windows Update is the simplest path. Open Settings, navigate to Update & Security, then Windows Update, and click Check for updates. When Windows 11 appears in the available updates list, you'll see a Download and install button alongside messaging that the upgrade is ready for your device.
Click to begin the download. Expect 3–4 GB depending on your current build. The installation happens in the background while you work, though performance may slow. When the files are ready, Windows prompts you to restart. The actual upgrade takes 30–60 minutes, during which your PC will restart several times. All your files, installed applications, and settings carry over intact.
Method 2: Upgrade using Windows 11 Installation Assistant
If Windows Update hasn't offered the upgrade yet or you want direct control over the timing, download the Installation Assistant from Microsoft's official Windows 11 page. Run the executable and the tool will first verify your hardware meets the requirements before proceeding. The upgrade process is an in-place installation that preserves your files, apps, and settings. Click through the prompts to begin—the installation typically takes 30 to 60 minutes depending on your hardware and will restart your PC several times. You can continue light work during the download phase, but plan for downtime once the actual installation starts.
Method 3: Clean install with Windows 11 installation media
This is the advanced route for persistent upgrade failures or when you want a completely fresh Windows installation. The clean install wipes accumulated system clutter but erases everything on the target drive, so back up first.
Download the Media Creation Tool from Microsoft's Windows 11 download page and use it to create a bootable USB drive (8GB minimum). Restart your PC, enter the boot menu (usually F12, F2, or Del during startup), and select the USB drive. When the installer loads, choose Custom install rather than Upgrade. Select your target drive, delete existing partitions if needed, and proceed.
Your Windows 10 product key will activate Windows 11 automatically once the installation finishes and you connect to the internet.
Troubleshooting common upgrade blockers
If you see "This PC can't run Windows 11," the issue is usually TPM 2.0, Secure Boot, or storage. To enable TPM, restart your PC and enter BIOS (typically by pressing F2, F10, or Delete during boot). Look for a setting called PTT (Intel) or fTPM (AMD) under Security, then enable it. Secure Boot is usually in the Boot menu — switch it from Legacy/CSM to UEFI mode. For storage issues, use Disk Cleanup to remove temporary files and old Windows installations, or uninstall large programs you don't need.
If the upgrade stalls or fails, run the Windows Update troubleshooter from Settings > System > Troubleshoot. Check the error code and search Microsoft's support site for specific fixes. If compatibility issues persist, the Windows 11 vs Windows 10 comparison can help you decide whether to wait.
Choose your upgrade path and verify compatibility first
You have three ways to upgrade to Windows 11 for free: through Windows Update for the simplest path, the Installation Assistant when you want more control, or a clean install when you need a fresh start. Before you begin, back up your data and verify your PC meets the system requirements using the PC Health Check tool. If you run into compatibility issues, most can be fixed by enabling TPM 2.0 and Secure Boot in your BIOS settings. Start with Windows Update first; if the upgrade isn't available yet or you encounter problems, move to the Installation Assistant. Reserve the clean install for situations where an in-place upgrade fails or you specifically want to wipe your system.