
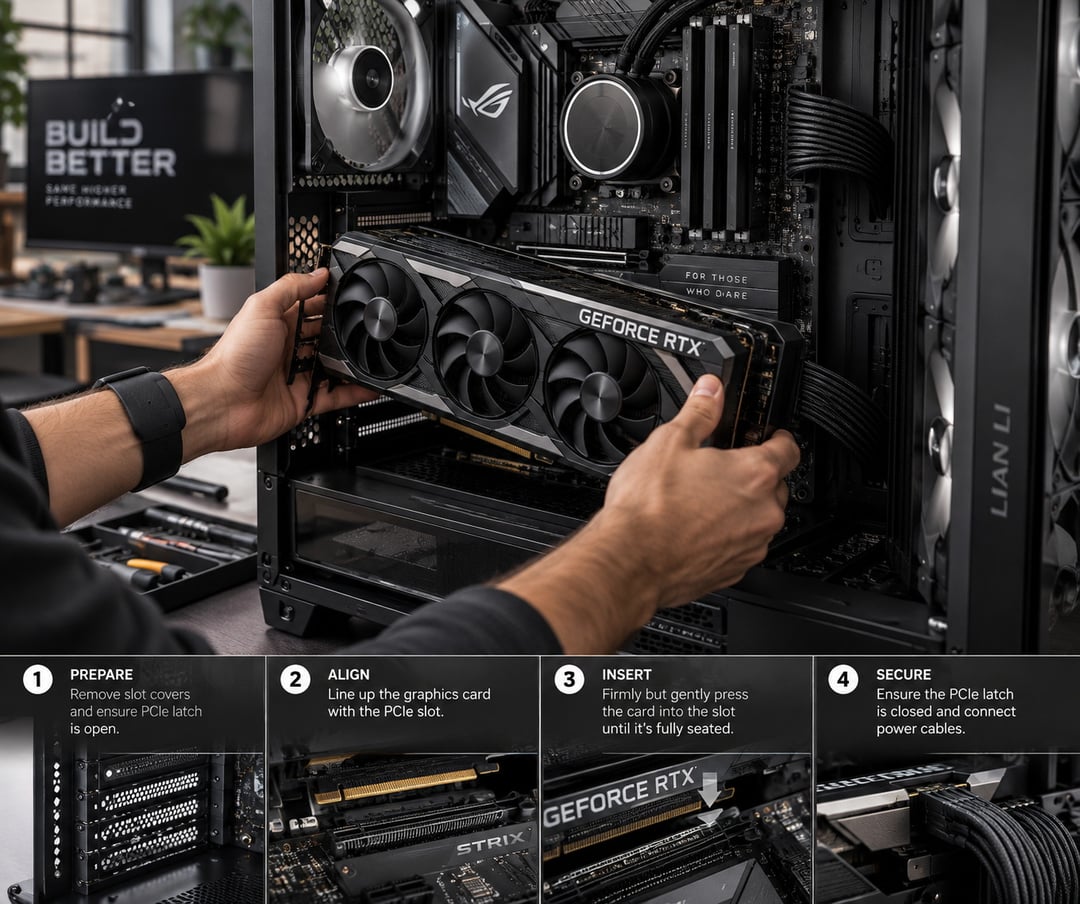
A new graphics card can make an older desktop feel alive again. Games run smoother, creative apps respond faster, and high-resolution displays become easier to drive. But installing a GPU is less about brute force than careful preparation. This step-by-step guide shows how to install a graphics card safely, connect it correctly, and confirm it works before you settle in for a long gaming session.
Check Compatibility Before You Install a Graphics Card
The best time to discover a compatibility problem is before the side panel comes off. Most modern desktop graphics cards use a full-length PCIe x16 slot, but physical fit, power requirements, and cable clearance matter just as much.
First, check the graphics card’s length, height, and thickness against your case specifications. A large card may collide with a front-mounted radiator, storage cage, or case frame. It may also occupy three or more rear expansion slots.
Next, check the power supply. The card manufacturer lists a recommended PSU wattage and the required power connectors. Compare those requirements with the label on your power supply and the cables it actually provides.
Confirm the PCIe x16 Slot and Motherboard Fit
Install the card in the primary full-length PCIe x16 slot whenever your motherboard manual recommends it. This slot is usually closest to the CPU socket and often provides the best lane configuration.
PCIe generations are generally backward compatible. A PCIe 5.0 card can work in an older compatible slot, though it will operate at the speed supported by both the motherboard and card. PCI-SIG’s PCI Express specifications define the interface standards behind that compatibility.
Check Case Dimensions and Cable Clearance
Measure the free internal length of the case rather than trusting the number of expansion slots. Leave room for power cables too, especially if the GPU uses a 16-pin power connector that needs a gentle bend rather than a sharp fold against the side panel.
Heavy cards can also sag over time. If the manufacturer includes a support bracket, use it. A simple brace can keep the card level and reduce strain on the motherboard slot.
Verify PSU Wattage and Graphics Card Power Connectors
Some lower-power GPUs draw all required power from the motherboard slot. Most midrange and high-end cards need extra power from the PSU through 6-pin, 8-pin, multiple 8-pin, or 16-pin connectors.
Use only cables supplied with that exact power supply or approved by its manufacturer. Modular PSU cables can look interchangeable while using different wiring. Mixing them can damage components. That’s an expensive shortcut nobody enjoys learning about.
Tools and Safety Steps Before Opening the PC
You don’t need a workbench that looks like a repair shop. A Phillips screwdriver, your motherboard manual, the GPU manual, and a clean hard surface are usually enough.
Shut down the PC, turn off the PSU switch, and unplug the power cable. Then press the case power button for a few seconds to clear residual charge. Work away from carpet if possible and touch unpainted metal on the case before handling the card.
ASUS also recommends disconnecting power before working inside the system in its graphics-card installation instructions.
How to Remove Your Existing Graphics Card
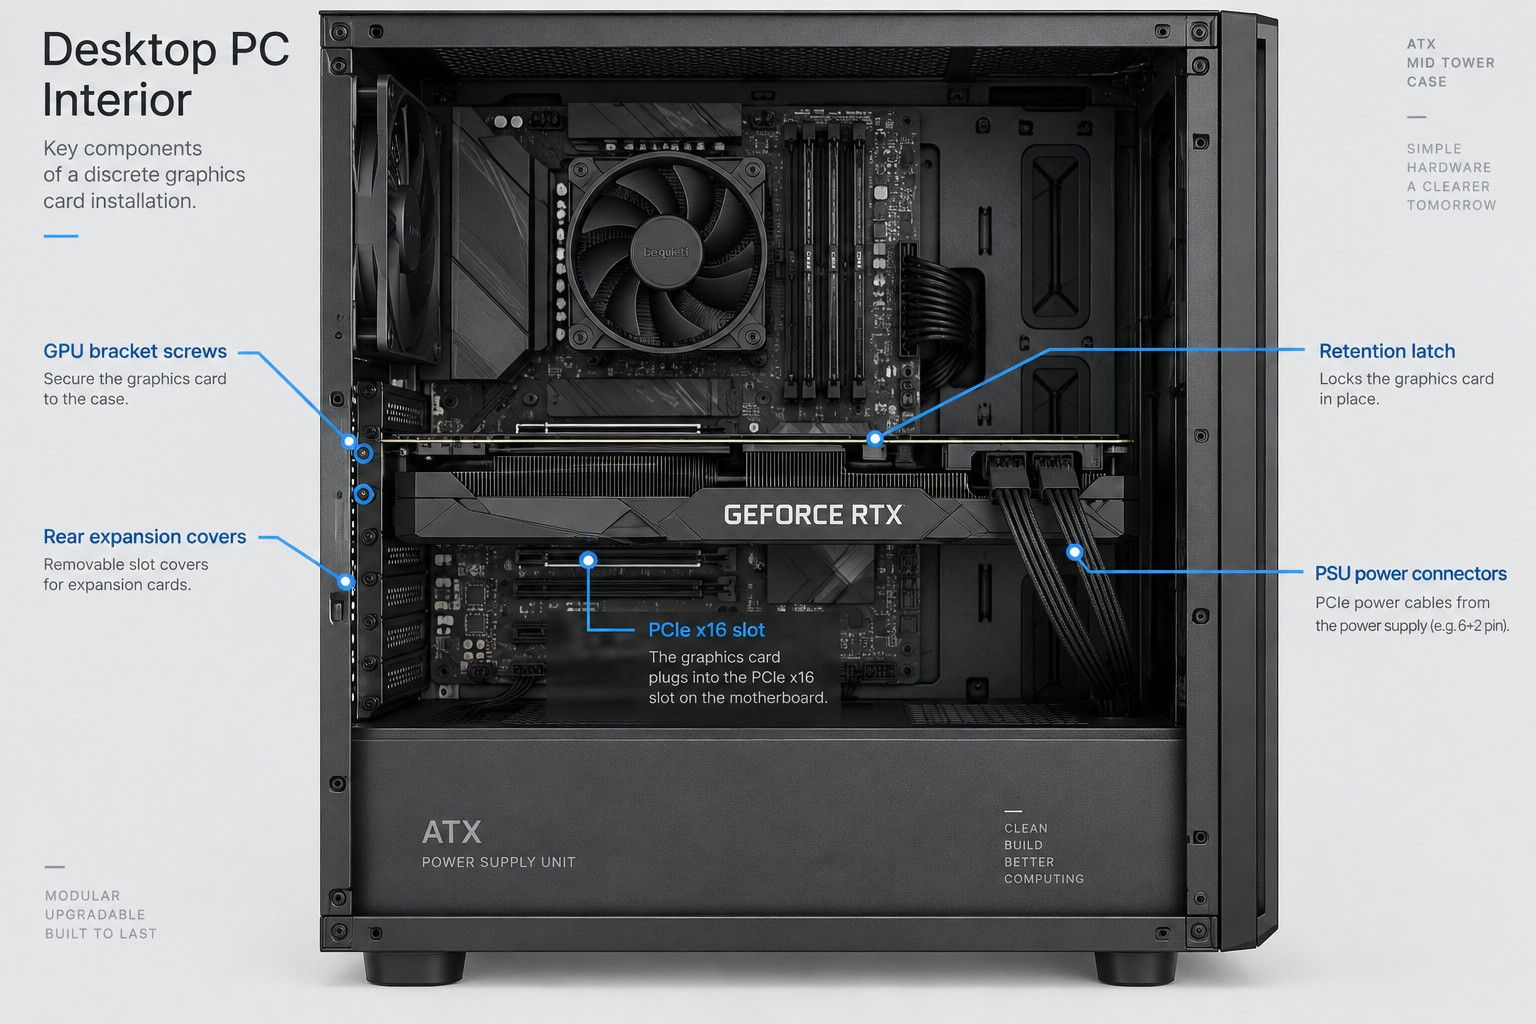
Removing the old GPU takes patience. The card is secured at the rear of the case and locked into the motherboard slot, so don’t pull until both points are released.
Start by disconnecting the monitor cable. Open the case, unplug any GPU power connectors, and remove the screws holding the card’s rear bracket to the case. Then press or pull the PCIe retention latch at the end of the slot.
Lift the card straight out with steady pressure. If it resists, stop and check the latch again. Forcing it can damage the slot or motherboard.
If you plan to keep the old card, store it in an anti-static bag. That makes later testing, resale, or warranty work much easier.
How to Install a Graphics Card Step by Step
The physical installation is straightforward once the case is ready.
- Remove the rear expansion-slot covers that match the card’s bracket width.
- Align the card with the PCIe x16 slot and the open rear slots.
- Press straight down with even pressure until the PCIe latch clicks into place.
- Secure the graphics card bracket to the case with its screws.
- Connect every required GPU power connector from the PSU.
- Refit the side panel, reconnect power, and connect the monitor to the new graphics card.
ASUS’s installation guidance follows the same essential sequence: seat the card, secure it, then attach the required power.
Connect Graphics Card Power Safely
Check that every connector is fully seated. A plug that looks connected but sits slightly loose can cause a black screen, crashes, or a warning light on the GPU.
Follow the graphics card manufacturer’s instructions for multi-connector cards and included adapters. Don’t use loose adapters, damaged cables, or modular PSU leads from another power supply.
Secure the GPU and Manage Cables
A properly installed card should sit level and feel secure at both the PCIe slot and rear bracket. Keep power cables clear of the fans and avoid pressing the side panel against tightly bent connectors.
Think of cable clearance like closing an overstuffed suitcase. If it only shuts with force, something inside needs rearranging.
Install GPU Drivers and Confirm the Upgrade Worked
Your system may display an image immediately, but it still needs the correct driver. Download the current driver package directly from the GPU manufacturer. AMD provides current packages through its Drivers and Support page.
After installation, confirm that the operating system recognizes the card. In Windows, check Device Manager and the graphics control software. Then verify the display resolution, refresh rate, and monitor arrangement.
Run a game, benchmark, or demanding creative task for several minutes. Watch for visual artifacts, repeated crashes, excessive fan noise, or sudden shutdowns. Those signs usually point to a seating, power, cooling, or driver issue.
Troubleshoot No Display or a GPU That Isn’t Detected
A no-display problem is frustrating, but the fix is often simple. Start with the monitor cable. It must connect to the graphics card’s output, not the motherboard’s video port.
Next, confirm the monitor uses the correct input. Then power down the PC and check that the GPU is fully seated, the retention latch is engaged, and every required power connector is attached.
Try another display cable or GPU output port if the screen remains blank. Motherboard diagnostic LEDs can also narrow down the problem. Consult the motherboard manual before changing BIOS settings or assuming the new card has failed.
FAQ
Do I need to uninstall old GPU drivers first?
Not always. A same-brand upgrade usually works with a normal driver update. Removing old software can help when switching between GPU brands or troubleshooting driver conflicts.
Can I install a graphics card in any PCIe slot?
Use the slot specified in the motherboard manual. The primary full-length PCIe x16 slot is normally the best choice for a graphics card.
Why does my PC turn on but show no display after installation?
Check the monitor connection, selected input, GPU seating, and PCIe power connectors. A loose cable or monitor plugged into the motherboard is a common cause.
Does every graphics card need a PCIe power cable?
No. Some lower-power cards run entirely from the PCIe slot. Check the GPU’s specifications before installation.
Finish the Graphics Card Installation With a Quick Check
Knowing how to install a graphics card comes down to a sensible order: confirm space and power first, seat the card evenly, connect every required cable, install current drivers, and test the system under load.
Take five extra minutes to inspect the connectors and monitor placement. It’s a small habit that can save you hours of staring at a perfectly good black screen.