
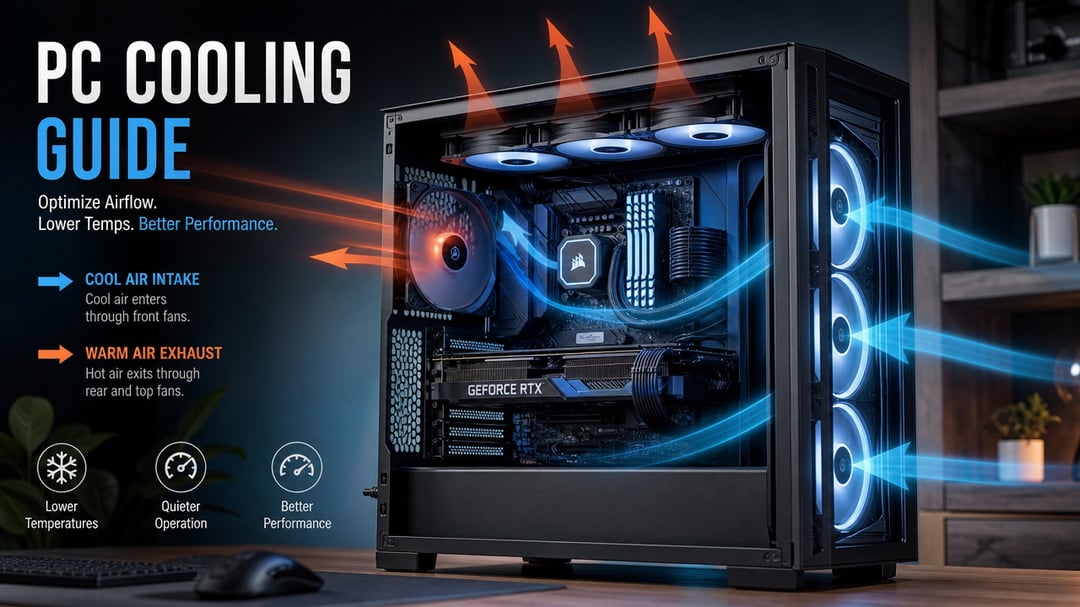
Adding more fans to your PC seems like the obvious fix when temperatures climb, but most airflow problems come from imbalance, not a lack of hardware. If you want to know how to improve PC airflow, the answer depends less on fan count and more on understanding how air moves through your case.
Most builds suffer from poor intake-exhaust ratios, blocked vents, or fans fighting each other instead of working together. A case with three fans configured correctly will run cooler than one with six fans placed randomly. By the end of this guide, you'll know how to diagnose what's limiting airflow in your system, where to position fans for the best results, and when adding another fan actually makes a measurable difference in temperatures.
Intake and exhaust balance: the foundation of airflow
Intake fans, typically mounted at the front or bottom of a case, pull cool air into the system. Exhaust fans at the top and rear push hot air out. The ratio between these two determines your pressure configuration.
Balanced airflow means equal volumes of intake and exhaust. When intake exceeds exhaust, you create positive pressure. The case pressurizes slightly, and air escapes through unfiltered gaps. When exhaust exceeds intake, negative pressure forms, pulling air in through every opening, including unfiltered cracks and cable grommets.
Positive pressure keeps dust out better because all incoming air passes through filtered intake points. Negative pressure brings in unfiltered air from every gap, coating components faster. Neutral configurations offer no dust advantage and require precise matching, which changes as fans age at different rates.
For most builds, aim for slightly positive pressure: one or two more intake fans than exhaust, or larger intake fans running at similar speeds. This reduces cleaning frequency without affecting temperatures noticeably, since the small pressure difference has minimal thermal impact compared to total airflow volume.
Fan placement and orientation: where fans actually make a difference
Intake fans belong at the front and bottom of the case, where they pull cool air directly toward the hottest components. Exhaust fans go at the rear and top, letting warm air escape along its natural upward path. Reversing this layout forces air to fight gravity and creates turbulence that reduces cooling efficiency.
Check fan direction by looking at the frame. The side with structural support arms or bracing is where air exits. Most fans also print an arrow on the frame showing rotation direction and airflow. If you're uncertain, hold a tissue near the spinning blades to see which way it moves.
GPU and CPU cooler fans introduce complications. Tower coolers blowing toward the side panel can fight front intake fans if both streams collide. Downdraft CPU coolers work better in cases with strong top exhaust. GPUs exhausting into the case need either a direct path to rear exhaust or enough case fans to flush the heat before it recirculates into the CPU cooler's intake. The most common mistake is blocking the GPU's own exhaust with a bottom intake fan positioned too close.
Obstructions and cable management: the hidden airflow killers
Loose cables in the main chamber don't just look messy. They disrupt airflow patterns and create stagnant pockets where heat accumulates. A bundle of SATA or peripheral cables dangling in front of an intake fan can reduce effective airflow by forcing air to navigate around the obstruction instead of flowing straight to components that need cooling. Route cables behind the motherboard tray or use velcro straps to keep them flat against the case frame.
Dust filters protect components but add resistance. Clean filters have minimal impact, but a clogged filter forces fans to work harder and reduces intake volume. Check and clean filters monthly if you have pets or carpet nearby.
Front panel design matters more than most builders expect. A solid or tempered glass front panel chokes intake fans, even when vents exist along the edges. Mesh panels allow significantly more air through. If your case has a restrictive front, removing the panel during intensive tasks can drop temperatures by several degrees.
Drive cages and PSU shrouds also block airflow. Remove unused drive bays when possible, and verify that bottom-mounted PSU shrouds include ventilation cutouts.
When more fans help and when they don't
More fans help when airflow is your bottleneck, not when obstructions or case design limit throughput. If cables block the front intake or your case has minimal ventilation, adding fans moves the same restricted air faster without improving cooling. Test this by running your PC with the side panel off. If temperatures drop significantly (10°C or more), airflow is the problem and fans will help. If temperatures stay roughly the same, the issue is component-level cooling like an insufficient CPU cooler or GPU thermal paste, and fans won't fix it.
When fans do help, expect GPU and CPU temperatures to drop 5-8°C with proper intake and exhaust balance. Smaller drops (2-3°C) suggest you're approaching diminishing returns, where additional fans add noise without meaningful improvement. Most cases see peak cooling efficiency with three to five fans. Beyond that, you're fighting turbulence and case design limits. If you've already balanced intake and exhaust and temperatures remain high, address the heat source directly rather than adding more airflow.
Start with balance and placement before adding more fans
Start by checking your current intake and exhaust balance. If you have more exhaust than intake, add a front or bottom fan to create slight positive pressure, which keeps dust out and temperatures stable. Clear any cable clutter in the main chamber and verify that your front panel isn't choking intake—if temperatures drop significantly with the side panel off, your case design is the real problem, not fan count. Adding more fans only helps when airflow is actually restricted. If you've already balanced intake and exhaust, removed obstructions, and temperatures are still acceptable, extra fans will just add noise. Test one change at a time and measure before and after so you know what actually worked.